Showing posts with label silhouette. Show all posts

Monday, October 14, 2013

Personalized Crown Royal Bottle Soap Dispensers

Lately I have found myself saving all the glass bottles and jars that we use in my house.  While going through them today I decided that the crown royal bottles would make good soap dispensers for my bathrooms!  They look better than the plastic bottles that were already in there.


While I was letting the bottles soak, to easily remove the labels, I thought that the bottles have enough room that I would be able to monogram them with our initial.  So I brought the initial up in the silhouette studio and sized it to fit on the front of the bottle.


While the initials were cutting, I removed the labels and used a little acetone to wipe down the areas where the labels were to ensure there was no glue residue left.


While the bottles were drying I trimmed the initial and put transfer paper, for glass etching I use contact paper to cut the stencil and for the transfer paper, on top for easier placement on the bottles.


I centered the initial the best I could and removed the clear contact paper.


I put a coat of Armour Etch on the stencil and let them set for about 5 minutes.  I them rinsed each bottle and removed the  stencil.


Here are the finished bottles before I added the soap and pumps.  I found that the larger soft soap pumps work great for these bottles.  
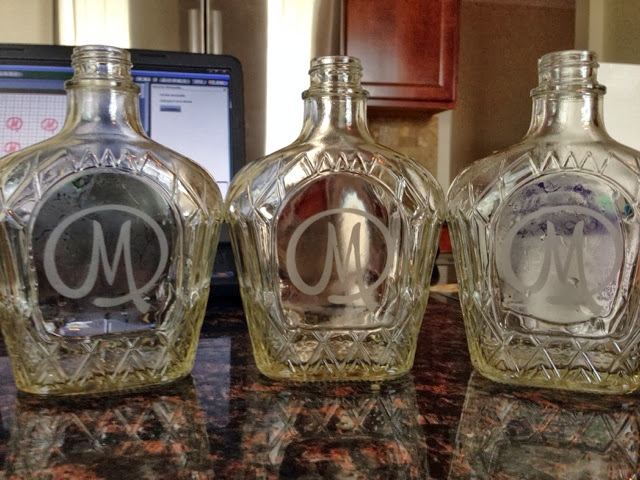

This is the soap dispenser I made for my kitchen.


Friday, July 19, 2013

DIY Faux Chalkboard Look

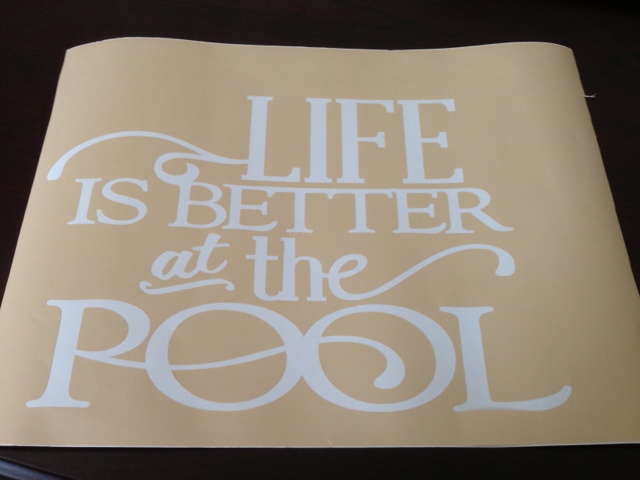
Since the rain has finially slowed down here it is time to for the pool to begin.  And when I saw this quote in the silhouette shop I knew it would be perfect for my soon to be pool area!  I just couldn't decide if I wanted to make it on wood, like a sign or not.  Well when I was shopping in Michaels last week, I found slate pieces and knew that the saying was going on it.

I loaded the quote on the silhouette studio and resized it to fit on the slate piece.  I then cut it out on tan vinyl that I had found on clearance.

After the quote was cut I removed all the letters so I could transfer the whole piece to the slate.


Using clear contact paper I transferred the quote.  Make sure you get any air bubbles or gaps out before taking off the clear contact paper.

Using white craft paint I began painting the letters.

Here it is completely painted.  Make sure to let it dry completely before removing the vinyl template.

After removing the vinyl, I used a sanding block and lightly sanded the whole piece giving it a chalkboard appearance, without using chalk.


This will be the perfect addition to my backyard when it gets completed!!

A little crafting time!

My days have been so filled with family stuff that I haven't been able to do anything it seems like!  I decided to carve out a little me time to do something creative.

When I have been out, I always try to go to one of the local craft stores to look around and always manage to buy something.  I have all these supplies in my craft room so I am going to put them to good use.

I found a vinyl quote on the silhouette store that I wanted to use so I used my cameo and cut that out.  I already had the colors I wanted to use picked out, a coral and tropical blue.  I painted a base coat of coral on a wooden plaque then transferred the vinyl saying onto the painted plaque.  Then I painted the whole plaque the tropical blue, I painted 2 coats then let it dry completely.  After drying I removed the vinyl letters and lightly sanded around the edges.  

Here is the finished piece:

Saturday, June 29, 2013

DIY Bleached T Shirt

This week at the Silhouette Blog for the Weekly Shape Challenge, the flower ornament design from Hero Arts was chosen for the challenge shape.  I saw the flower and I knew exactly what I wanted to try to make with it.

I loaded the shape and cut it out using my silhouette cameo, onto freezer paper. 


After cutting the shape I placed the flower cut out onto the bottom corner of an old v-neck shirt i had hanging in my closet.  When putting the image that was cut on the fabric, make sure the wax side of the paper is on the fabric, then you will need to iron the pattern so it will stick to the fabric.  I set my iron to medium and the freezer paper stuck to the shirt.


After you have ironed the pattern down, make sure you put something inside the shirt, like cardboard so the bleach doesn't go through to the back of the shirt.
I didn't use straight bleach, I mixed it 75% bleach to 25% water to dilute it some.  I added the bleach and water to a spray bottle and started spraying.  The only advice I would offer is to make sure you spray from a distance if you want the splattered look.  I was a little to close, but it was my first time and an old shirt, and I am still happy with the results.


Here is after I sprayed the bleach mixture on the shirt, I think this was only about 3 minutes after.  I then removed the freezer paper and rinsed out the bleached area.  Then I washed the shirt and hung it up to dry.


This is the shirt after I removed it from the washer to hang to dry.


Here is a close up of the pattern!


Wednesday, May 8, 2013

Wedding Gifts


My friend's niece got married this past weekend and she wanted me to make something personalized for her.  This is what I made for her using my silhouette...

I found a really cute frame to put it in.

Then the mother of the bride decided she wanted something to give to her on her big day, so we came up with this...

Since this was sized 12 x 12, I was able to get a shadow box frame that this looked great in.  

My friend's daughter saw the gift and she wanted one too do I made this for her...