Friday, July 19, 2013

DIY Embroidered Dishtowel

While looking around the silhouette blog I came across a project where a flower was cut out and embroidered onto a piece of linen for some cute wall art.  I decided that I could do this too!  Anyone who knows me, knows that unless it is a button needing to be sewn on or a small repair, I can not sew at all.  One day I will learn to sew with the sewing machine that is sitting in my daughter's closet, but until then, this will have to work for my new found fascination with needles and thread.

I decided to make some personalized dishtowels for my kitchen.  I found a 4 pack of plain white dish towels at target for about $2.50, so with this project in mind I got them.  My next stop was Michaels to get embroidery floss and needles.  I got so many different colors to choose from, including some varigated colors.

To start this project I decided on the monogram I wanted on my dishtowels and loaded it on the silhouette studio.  I resized it to the desired size and cut it out on tan cardstock.


Here is my M monogram after it was cut.  I used spray adhesive and placed it on my dishtowel.  I wanted to make sure it stuck down before I started embroidering.


Once the cardstock was stuck to the dishcloth, I began with the stiching.  I chose an orange varigated floss to use, the orange ties in with the color scheme I have in my kitchen.  It took about 1 and 1/2 skeins to finish this project. 
I really like the lift that the cardstock gives to the embroidery.


Here is the finished dish towel hanging on my oven.


DIY Faux Chalkboard Look

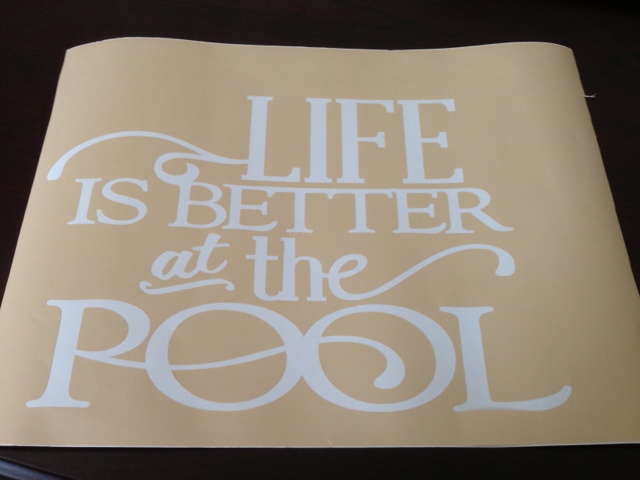
Since the rain has finially slowed down here it is time to for the pool to begin.  And when I saw this quote in the silhouette shop I knew it would be perfect for my soon to be pool area!  I just couldn't decide if I wanted to make it on wood, like a sign or not.  Well when I was shopping in Michaels last week, I found slate pieces and knew that the saying was going on it.

I loaded the quote on the silhouette studio and resized it to fit on the slate piece.  I then cut it out on tan vinyl that I had found on clearance.

After the quote was cut I removed all the letters so I could transfer the whole piece to the slate.


Using clear contact paper I transferred the quote.  Make sure you get any air bubbles or gaps out before taking off the clear contact paper.

Using white craft paint I began painting the letters.

Here it is completely painted.  Make sure to let it dry completely before removing the vinyl template.

After removing the vinyl, I used a sanding block and lightly sanded the whole piece giving it a chalkboard appearance, without using chalk.


This will be the perfect addition to my backyard when it gets completed!!

A little crafting time!

My days have been so filled with family stuff that I haven't been able to do anything it seems like!  I decided to carve out a little me time to do something creative.

When I have been out, I always try to go to one of the local craft stores to look around and always manage to buy something.  I have all these supplies in my craft room so I am going to put them to good use.

I found a vinyl quote on the silhouette store that I wanted to use so I used my cameo and cut that out.  I already had the colors I wanted to use picked out, a coral and tropical blue.  I painted a base coat of coral on a wooden plaque then transferred the vinyl saying onto the painted plaque.  Then I painted the whole plaque the tropical blue, I painted 2 coats then let it dry completely.  After drying I removed the vinyl letters and lightly sanded around the edges.  

Here is the finished piece:

Wednesday, July 3, 2013

Happy 4th of July!

After being invited to a friend's house tomorrow to celebrate the 4th with a day of swimming, grilling out, and fireworks, I decided that I needed to make a little hostess gift. 

My oldest wanted me to make cake pops for her to take to her friend's lake house where she will be spending the 4th, so I spent the majority of the day working on the cake pops.

For the hostess gift I took a glass vase and glass etched their initial on it so it could be used later for whatever.  I filled the bottom of the vase with decorative rocks and loaded it with red, white, and blue cake pops.  I also added some cute bags with red, white, and blue M&Ms with red and blue fireworks attached.


Seeing that I had so many cake pops left over I made a little centerpiece for my dining room table.  I just put some of the decorative rocks in the bottom of two different sized mason jars and added the red, white, and blue cake pops.  Hopefully the cake pops will last until tomorrow, so I will still have my cute centerpiece intact!