Tuesday, November 26, 2013

2013 Christmas Planner

I have been searching for the Christmas planner that would work best for me, and after figuring out what I needed in it, I decided to make one myself. 

For the covers and divider pages I used the Lori Whitlock Planner Cover and Tabs digital cutting file.  I just uploaded them to my Silhouette Cameo and resized them to the size I needed, 8x5.  For the insert pages I just made something using the Microsoft Word program I had on my computer.  I am sad I couldn't make any of the cute pages I saw on my searches, but they will come in very handy.  If anyone has any suggestions on any other programs that I can use to make lists, calendar pages, and planner pages I would really appreciate it.  Maybe it will go on my wishlist for Christmas!

The paper that I used for this project is from the Heidi Swapp Believe collection.  I am so glad that I found the paper pad at my local Hobby Lobby because they are awesome!


I wanted to show the side view of this planner.  No tabs sticking out from the covers, getting caught on things or bent!  I love it!


I think the hardest part was trying to figure out how I wanted to label my divider pages.  In my planner there are 12 different sections, that number would probably be different for everyone depending on what sections they would want included.  The sections included in mine are:  Calendar, To-Do's, Gifts to Buy, Stocking Stuffers, My Wishlist, Handmade Gifts, Cards to Send, Christmas Baking, Menu Planner, Shopping Lists, Notes, and Staying on Budget.

I remembered that I had some Project Life grid cards so I just used a paper punch to make tags,  I wrote each section name on each tag and adhered them on.  So simple!


Here is an example of one of my insert pages.


I also wanted a place to keep all of my receipts together so I found a pocket folder file on the silhouette store, the Lori Whitlock One Pocket Folder that I used to make storage for the receipts.


I will definitely be prepared for Christmas now that I have my planner.  Now all that is left is finishing my Countdown to Christmas book.  Hopefully I will be able to finish that in the next few days.

Monday, October 14, 2013

Personalized Crown Royal Bottle Soap Dispensers

Lately I have found myself saving all the glass bottles and jars that we use in my house.  While going through them today I decided that the crown royal bottles would make good soap dispensers for my bathrooms!  They look better than the plastic bottles that were already in there.


While I was letting the bottles soak, to easily remove the labels, I thought that the bottles have enough room that I would be able to monogram them with our initial.  So I brought the initial up in the silhouette studio and sized it to fit on the front of the bottle.


While the initials were cutting, I removed the labels and used a little acetone to wipe down the areas where the labels were to ensure there was no glue residue left.


While the bottles were drying I trimmed the initial and put transfer paper, for glass etching I use contact paper to cut the stencil and for the transfer paper, on top for easier placement on the bottles.


I centered the initial the best I could and removed the clear contact paper.


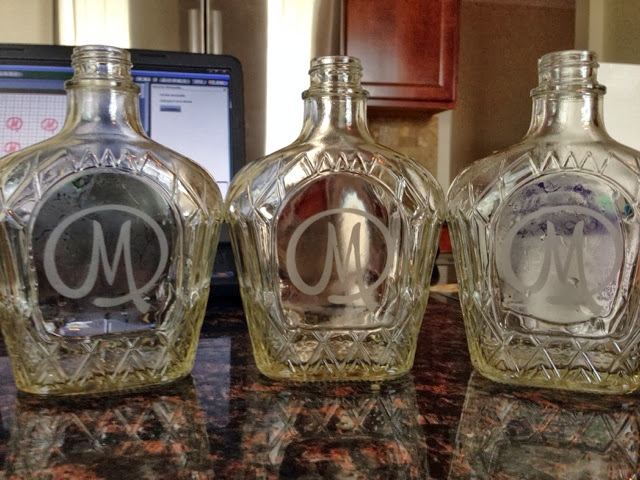
I put a coat of Armour Etch on the stencil and let them set for about 5 minutes.  I them rinsed each bottle and removed the  stencil.


Here are the finished bottles before I added the soap and pumps.  I found that the larger soft soap pumps work great for these bottles.  


This is the soap dispenser I made for my kitchen.


Thursday, September 5, 2013

Ready For Fall

Since the cooler weather is making an appearance around here I decided it was time to decorate for fall!

After seeing this great Fall word art on the Silhouette design studio, I knew that it would be a great addition to my mantel.  I wanted to keep the colors simple so I stuck with a dark brown and white.


Mason jars are everywhere these days, especially the painted and distressed ones.  I thought that they would look awesome in fall colors with some pretty flowers added to them.

I looked at some of the tutorials that people had shared on Pinterest and thought to myself that I should be able to make them too.  I picked out fall colors, orange, brown, and a foliage green to paint them.  The green jar did really well, but I had to work on the brown and orange for a while.  Once the paint dried I used a nail file to distress the jars, then sprayed a clear coat to give some protection to the paint.

I added some greenery and sunflowers, which are my favorite, to complete them. I think that I did pretty good for my first try!


I added an Owl wine cork holder, that I just bought when we went on vacation last week, to the mantel.  

Here is my "Ready For Fall" mantel!


Tuesday, September 3, 2013

The Break Is Over

The end of July and the month of August are always busy at my house!  It seems like there is not enough time to get everything done...  Getting my oldest ready for her second year if college, my middle one got her license and will begin her junior year of high school, and getting my youngest through drivers ed, her driving permit and beginning her freshman year if high school took its toll on me!  

My craft time was practically nonexistent, except for the things my daughter wanted me to make for her dorm room.  I had to make her a new RUN decal for her car, a vinyl saying for her computer, and a message board.


Once we got her moved back in to college my husband decided that we were going to take a short vacation!  This is the first vacation that we have taken in 19 years without the girls!  Thank goodness for the security cameras and the iPhone app that my girls have named "the stalking app", so I could see where they were, and make sure they didn't decide to throw any wild parties or anything!  


The hubby took me to Asheville to visit Biltmore Estates!  It was so nice there!  We toured the house, went through the gardens, did some wine tasting, and shopped some!  I think the best thing was that I didn't have to cook or clean at all!

I got some rest and relaxation so now I am going to craft it up!!

Friday, July 19, 2013

DIY Embroidered Dishtowel

While looking around the silhouette blog I came across a project where a flower was cut out and embroidered onto a piece of linen for some cute wall art.  I decided that I could do this too!  Anyone who knows me, knows that unless it is a button needing to be sewn on or a small repair, I can not sew at all.  One day I will learn to sew with the sewing machine that is sitting in my daughter's closet, but until then, this will have to work for my new found fascination with needles and thread.

I decided to make some personalized dishtowels for my kitchen.  I found a 4 pack of plain white dish towels at target for about $2.50, so with this project in mind I got them.  My next stop was Michaels to get embroidery floss and needles.  I got so many different colors to choose from, including some varigated colors.

To start this project I decided on the monogram I wanted on my dishtowels and loaded it on the silhouette studio.  I resized it to the desired size and cut it out on tan cardstock.


Here is my M monogram after it was cut.  I used spray adhesive and placed it on my dishtowel.  I wanted to make sure it stuck down before I started embroidering.


Once the cardstock was stuck to the dishcloth, I began with the stiching.  I chose an orange varigated floss to use, the orange ties in with the color scheme I have in my kitchen.  It took about 1 and 1/2 skeins to finish this project. 
I really like the lift that the cardstock gives to the embroidery.


Here is the finished dish towel hanging on my oven.


DIY Faux Chalkboard Look

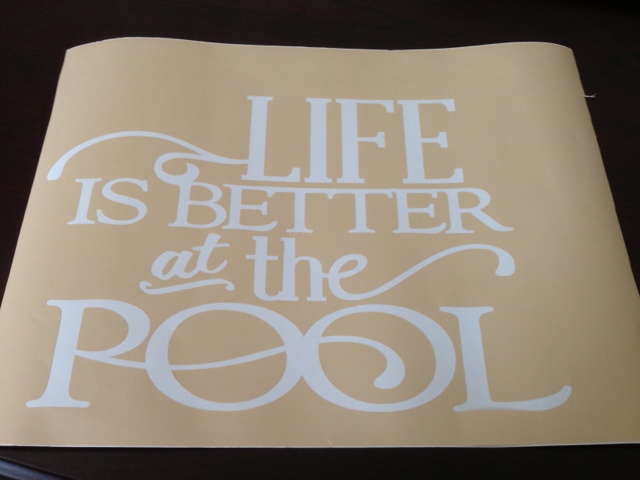
Since the rain has finially slowed down here it is time to for the pool to begin.  And when I saw this quote in the silhouette shop I knew it would be perfect for my soon to be pool area!  I just couldn't decide if I wanted to make it on wood, like a sign or not.  Well when I was shopping in Michaels last week, I found slate pieces and knew that the saying was going on it.

I loaded the quote on the silhouette studio and resized it to fit on the slate piece.  I then cut it out on tan vinyl that I had found on clearance.

After the quote was cut I removed all the letters so I could transfer the whole piece to the slate.


Using clear contact paper I transferred the quote.  Make sure you get any air bubbles or gaps out before taking off the clear contact paper.

Using white craft paint I began painting the letters.

Here it is completely painted.  Make sure to let it dry completely before removing the vinyl template.

After removing the vinyl, I used a sanding block and lightly sanded the whole piece giving it a chalkboard appearance, without using chalk.


This will be the perfect addition to my backyard when it gets completed!!

A little crafting time!

My days have been so filled with family stuff that I haven't been able to do anything it seems like!  I decided to carve out a little me time to do something creative.

When I have been out, I always try to go to one of the local craft stores to look around and always manage to buy something.  I have all these supplies in my craft room so I am going to put them to good use.

I found a vinyl quote on the silhouette store that I wanted to use so I used my cameo and cut that out.  I already had the colors I wanted to use picked out, a coral and tropical blue.  I painted a base coat of coral on a wooden plaque then transferred the vinyl saying onto the painted plaque.  Then I painted the whole plaque the tropical blue, I painted 2 coats then let it dry completely.  After drying I removed the vinyl letters and lightly sanded around the edges.  

Here is the finished piece:

Wednesday, July 3, 2013

Happy 4th of July!

After being invited to a friend's house tomorrow to celebrate the 4th with a day of swimming, grilling out, and fireworks, I decided that I needed to make a little hostess gift. 

My oldest wanted me to make cake pops for her to take to her friend's lake house where she will be spending the 4th, so I spent the majority of the day working on the cake pops.

For the hostess gift I took a glass vase and glass etched their initial on it so it could be used later for whatever.  I filled the bottom of the vase with decorative rocks and loaded it with red, white, and blue cake pops.  I also added some cute bags with red, white, and blue M&Ms with red and blue fireworks attached.


Seeing that I had so many cake pops left over I made a little centerpiece for my dining room table.  I just put some of the decorative rocks in the bottom of two different sized mason jars and added the red, white, and blue cake pops.  Hopefully the cake pops will last until tomorrow, so I will still have my cute centerpiece intact!


Saturday, June 29, 2013

DIY Bleached T Shirt

This week at the Silhouette Blog for the Weekly Shape Challenge, the flower ornament design from Hero Arts was chosen for the challenge shape.  I saw the flower and I knew exactly what I wanted to try to make with it.

I loaded the shape and cut it out using my silhouette cameo, onto freezer paper. 


After cutting the shape I placed the flower cut out onto the bottom corner of an old v-neck shirt i had hanging in my closet.  When putting the image that was cut on the fabric, make sure the wax side of the paper is on the fabric, then you will need to iron the pattern so it will stick to the fabric.  I set my iron to medium and the freezer paper stuck to the shirt.


After you have ironed the pattern down, make sure you put something inside the shirt, like cardboard so the bleach doesn't go through to the back of the shirt.
I didn't use straight bleach, I mixed it 75% bleach to 25% water to dilute it some.  I added the bleach and water to a spray bottle and started spraying.  The only advice I would offer is to make sure you spray from a distance if you want the splattered look.  I was a little to close, but it was my first time and an old shirt, and I am still happy with the results.


Here is after I sprayed the bleach mixture on the shirt, I think this was only about 3 minutes after.  I then removed the freezer paper and rinsed out the bleached area.  Then I washed the shirt and hung it up to dry.


This is the shirt after I removed it from the washer to hang to dry.


Here is a close up of the pattern!


Friday, June 28, 2013

A Little Red, White, and Blue

Taking a look at this weeks Weekly Shape Challenge on the Silhouette Blog, and seeing that it could be any project summer themed, I decided that I would make a set of 4th of July coasters.

I picked out the graphics that I wanted to use for this project and sized them down to fit on the coasters.  I loaded the paper and went to getting all the pieces cut out.


I added a thin coating of mod podge to the coaster and put the paper design on the coaster and then added another thin coat of mod podge on top to seal the paper. 


This is right after adding the top coat of mod podge, it was hard to get a picture while doing this step.


Here are all 4 coasters while they were drying.  After they completely dried, I let them sit for about 30 minutes to make sure, I sprayed a coat of clear sealer on the coasters.


When they were completely dry I added felt pieces to the back of each coaster so there will be no scuffing of tables when using these.


Here are the coasters tied up with a bit of twine.  These would make a great gift also, but I think I am going to keep these for myself.


Saturday, June 8, 2013

Easy Glass Etching Tutorial

I get so tired of walking into my girl's bathroom and seeing their stuff all over the counters.  So I decided to make them glasses with their names on them so their things wouldn't get mixed up.

I started out by finding the font I wanted to use with the silhouette studio.  This can be done using sticker letters also.  
I sized them to be proportionate to the glass and then put a square around each name to make it a little easier to make the name straight when adhering.


I loaded contact paper, only because I ran out of vinyl, but I found that for projects where I am just using it as a template it works just as well.
I set the cut settings to vinyl and cut out the templates that I would be using.


One cut, I removed all of the excess contact paper.  I removed the name area and put them on the glasses.


I used armour etch, this can be found at craft stores and I found mine at Hobby Lobby.  I applied the armour etch with a sponge brush to the letter areas.


After applying to all the letters I let the etching cream sit for between 5 to 10 minutes.


Once the 5 to 10 minutes have passed I rinsed off the excess and removed the contact paper, then washed the glass completely.


Here are the completed glasses.  Now maybe my girls can be a little more organized!